Предыдущая статья — Играем в GTA V c Python. Часть XIII: улучшаем наш автопилот.
Всем привет и добро пожаловать в новую часть серии статей про применение методов машинного обучения в игре Grand Theft Auto V. В данной статье мы рассмотрим применение TensorFlow Object Detection API в реальном игровом окружении GTA V.
Благодаря реалистичным представлениям объектов, которые созданы внутри GTA V, мы можем использовать детекторы объектов, созданные для реального мира, и по-прежнему получать отличные результаты. Например, мы можем обнаруживать автомобили, людей, знаки остановки, грузовики и стоп-сигналы.
В этой статье мы разберем реализацию API для обнаружения объектов. Если вы хотите узнать больше об API обнаружения объектов или о том, как отслеживать собственные настраиваемые объекты, ознакомьтесь с документацией TensorFlow Object Detection API. Хотя готовые модели работают довольно хорошо из коробки, ваша точность значительно возрастет, если вы обучите пользовательскую модель на основе данных игровой среды. Если вы хотите узнать, как это сделать, ознакомьтесь с руководством по обнаружению объектов, указанным выше.
Есть много способов использовать обнаружение объектов в нашей среде, но мы считаем, что один из наиболее очевидных — это обнаружение других транспортных средств и определение того, находятся ли они слишком близко. Как бы нам это сделать? Что ж, начнем с обнаружения автомобилей и воспользуемся для этого уже готовым кодом.
Как упоминалось выше, обучение определенной модели на основе данных GTA даст вам лучшие результаты, но мы сейчас просто собираемся использовать базовую модель из этой библиотеки. Возьмем учебный код из файла models/object_detection/object_detection_tutorial.ipynb и перенесем его в наш файл под названием vehicle_detector.py.
Удалив ненужное (во основном интерфейсы ввода и вывода), мы получим следующий код:
# coding: utf-8
# # Object Detection Demo
# License: Apache License 2.0 (https://github.com/tensorflow/models/blob/master/LICENSE)
# source: https://github.com/tensorflow/models
import numpy as np
import os
import six.moves.urllib as urllib
import sys
import tarfile
import tensorflow as tf
import zipfile

from collections import defaultdict
from io import StringIO
from matplotlib import pyplot as plt
from PIL import Image

# This is needed to display the images.
get_ipython().magic('matplotlib inline')

# This is needed since the notebook is stored in the object_detection folder.
sys.path.append("..")


# ## Object detection imports
# Here are the imports from the object detection module.

from utils import label_map_util
from utils import visualization_utils as vis_util


# # Model preparation
# What model to download.
MODEL_NAME = 'ssd_mobilenet_v1_coco_11_06_2017'
MODEL_FILE = MODEL_NAME + '.tar.gz'
DOWNLOAD_BASE = 'http://download.tensorflow.org/models/object_detection/'

# Path to frozen detection graph. This is the actual model that is used for the object detection.
PATH_TO_CKPT = MODEL_NAME + '/frozen_inference_graph.pb'

# List of the strings that is used to add correct label for each box.
PATH_TO_LABELS = os.path.join('data', 'mscoco_label_map.pbtxt')

NUM_CLASSES = 90


# ## Download Model
opener = urllib.request.URLopener()
opener.retrieve(DOWNLOAD_BASE + MODEL_FILE, MODEL_FILE)
tar_file = tarfile.open(MODEL_FILE)
for file in tar_file.getmembers():
  file_name = os.path.basename(file.name)
  if 'frozen_inference_graph.pb' in file_name:
    tar_file.extract(file, os.getcwd())


# ## Load a (frozen) Tensorflow model into memory.
detection_graph = tf.Graph()
with detection_graph.as_default():
  od_graph_def = tf.GraphDef()
  with tf.gfile.GFile(PATH_TO_CKPT, 'rb') as fid:
    serialized_graph = fid.read()
    od_graph_def.ParseFromString(serialized_graph)
    tf.import_graph_def(od_graph_def, name='')


# ## Loading label map
# Label maps map indices to category names, so that when our convolution network predicts `5`, we know that this corresponds to `airplane`.  Here we use internal utility functions, but anything that returns a dictionary mapping integers to appropriate string labels would be fine
label_map = label_map_util.load_labelmap(PATH_TO_LABELS)
categories = label_map_util.convert_label_map_to_categories(label_map, max_num_classes=NUM_CLASSES, use_display_name=True)
category_index = label_map_util.create_category_index(categories)


# ## Helper code
def load_image_into_numpy_array(image):
  (im_width, im_height) = image.size
  return np.array(image.getdata()).reshape(
      (im_height, im_width, 3)).astype(np.uint8)


# # Detection
# For the sake of simplicity we will use only 2 images:
# image1.jpg
# image2.jpg
# If you want to test the code with your images, just add path to the images to the TEST_IMAGE_PATHS.
PATH_TO_TEST_IMAGES_DIR = 'test_images'
TEST_IMAGE_PATHS = [ os.path.join(PATH_TO_TEST_IMAGES_DIR, 'image{}.jpg'.format(i)) for i in range(1, 3) ]

# Size, in inches, of the output images.
IMAGE_SIZE = (12, 8)

with detection_graph.as_default():
  with tf.Session(graph=detection_graph) as sess:
    for image_path in TEST_IMAGE_PATHS:
      image = Image.open(image_path)
      # the array based representation of the image will be used later in order to prepare the
      # result image with boxes and labels on it.
      image_np = load_image_into_numpy_array(image)
      # Expand dimensions since the model expects images to have shape: [1, None, None, 3]
      image_np_expanded = np.expand_dims(image_np, axis=0)
      image_tensor = detection_graph.get_tensor_by_name('image_tensor:0')
      # Each box represents a part of the image where a particular object was detected.
      boxes = detection_graph.get_tensor_by_name('detection_boxes:0')
      # Each score represent how level of confidence for each of the objects.
      # Score is shown on the result image, together with the class label.
      scores = detection_graph.get_tensor_by_name('detection_scores:0')
      classes = detection_graph.get_tensor_by_name('detection_classes:0')
      num_detections = detection_graph.get_tensor_by_name('num_detections:0')
      # Actual detection.
      (boxes, scores, classes, num_detections) = sess.run(
          [boxes, scores, classes, num_detections],
          feed_dict={image_tensor: image_np_expanded})
      # Visualization of the results of a detection.
      vis_util.visualize_boxes_and_labels_on_image_array(
          image_np,
          np.squeeze(boxes),
          np.squeeze(classes).astype(np.int32),
          np.squeeze(scores),
          category_index,
          use_normalized_coordinates=True,
          line_thickness=8)
Отлично, теперь давайте объединим этот код с нашим кодом GTA, а именно — с кодом в файле grabscreen.py, чтобы мы могли получать кадры игры.
Для этого нам надо импортировать библиотеки cv2 и grab_screen:
from grabscreen import grab_screen
import cv2
Далее вместо цикла for image_path in TEST_IMAGE_PATHS:мы будем использовать цикл while True:. А затем вместо захвата изображений и преобразования в массивы numpy мы можем просто использовать нашу функцию grab_screen, которая возвращает изображение уже в формате массива numpy. Итак, вместо:
image = Image.open(image_path)
# the array based representation of the image will be used      # later in order to prepare the
# result image with boxes and labels on it.
image_np = load_image_into_numpy_array(image)
мы будем использовать:
screen = cv2.resize(grab_screen(region=(0,40,1280,745)), (800,450))
image_np = cv2.cvtColor(screen, cv2.COLOR_BGR2RGB)
Наконец, после строки vis_util, сопоставляя наши кадры с обнаруженными объектами, мы можем визуализировать это при помощи следующего кода:
cv2.imshow('window',image_np)
if cv2.waitKey(25) & 0xFF == ord('q'):
     cv2.destroyAllWindows()
     break
Полный код будет таким:
# coding: utf-8
# # Object Detection Demo
# License: Apache License 2.0 (https://github.com/tensorflow/models/blob/master/LICENSE)
# source: https://github.com/tensorflow/models
import numpy as np
import os
import six.moves.urllib as urllib
import sys
import tarfile
import tensorflow as tf
import zipfile

from collections import defaultdict
from io import StringIO
from matplotlib import pyplot as plt
from PIL import Image
from grabscreen import grab_screen
import cv2

# This is needed since the notebook is stored in the object_detection folder.
sys.path.append("..")


# ## Object detection imports
# Here are the imports from the object detection module.

from utils import label_map_util
from utils import visualization_utils as vis_util


# # Model preparation
# What model to download.
MODEL_NAME = 'ssd_mobilenet_v1_coco_11_06_2017'
MODEL_FILE = MODEL_NAME + '.tar.gz'
DOWNLOAD_BASE = 'http://download.tensorflow.org/models/object_detection/'

# Path to frozen detection graph. This is the actual model that is used for the object detection.
PATH_TO_CKPT = MODEL_NAME + '/frozen_inference_graph.pb'

# List of the strings that is used to add correct label for each box.
PATH_TO_LABELS = os.path.join('data', 'mscoco_label_map.pbtxt')

NUM_CLASSES = 90

# ## Download Model
opener = urllib.request.URLopener()
opener.retrieve(DOWNLOAD_BASE + MODEL_FILE, MODEL_FILE)
tar_file = tarfile.open(MODEL_FILE)
for file in tar_file.getmembers():
  file_name = os.path.basename(file.name)
  if 'frozen_inference_graph.pb' in file_name:
    tar_file.extract(file, os.getcwd())


# ## Load a (frozen) Tensorflow model into memory.
detection_graph = tf.Graph()
with detection_graph.as_default():
  od_graph_def = tf.GraphDef()
  with tf.gfile.GFile(PATH_TO_CKPT, 'rb') as fid:
    serialized_graph = fid.read()
    od_graph_def.ParseFromString(serialized_graph)
    tf.import_graph_def(od_graph_def, name='')


# ## Loading label map
# Label maps map indices to category names, so that when our convolution network predicts `5`, we know that this corresponds to `airplane`.  Here we use internal utility functions, but anything that returns a dictionary mapping integers to appropriate string labels would be fine
label_map = label_map_util.load_labelmap(PATH_TO_LABELS)
categories = label_map_util.convert_label_map_to_categories(label_map, max_num_classes=NUM_CLASSES, use_display_name=True)
category_index = label_map_util.create_category_index(categories)


# ## Helper code
def load_image_into_numpy_array(image):
  (im_width, im_height) = image.size
  return np.array(image.getdata()).reshape(
      (im_height, im_width, 3)).astype(np.uint8)

# Size, in inches, of the output images.
IMAGE_SIZE = (12, 8)

with detection_graph.as_default():
  with tf.Session(graph=detection_graph) as sess:
    while True:
      #screen = cv2.resize(grab_screen(region=(0,40,1280,745)), (WIDTH,HEIGHT))
      screen = cv2.resize(grab_screen(region=(0,40,1280,745)), (800,450))
      image_np = cv2.cvtColor(screen, cv2.COLOR_BGR2RGB)
      # Expand dimensions since the model expects images to have shape: [1, None, None, 3]
      image_np_expanded = np.expand_dims(image_np, axis=0)
      image_tensor = detection_graph.get_tensor_by_name('image_tensor:0')
      # Each box represents a part of the image where a particular object was detected.
      boxes = detection_graph.get_tensor_by_name('detection_boxes:0')
      # Each score represent how level of confidence for each of the objects.
      # Score is shown on the result image, together with the class label.
      scores = detection_graph.get_tensor_by_name('detection_scores:0')
      classes = detection_graph.get_tensor_by_name('detection_classes:0')
      num_detections = detection_graph.get_tensor_by_name('num_detections:0')
      # Actual detection.
      (boxes, scores, classes, num_detections) = sess.run(
          [boxes, scores, classes, num_detections],
          feed_dict={image_tensor: image_np_expanded})
      # Visualization of the results of a detection.
      vis_util.visualize_boxes_and_labels_on_image_array(
          image_np,
          np.squeeze(boxes),
          np.squeeze(classes).astype(np.int32),
          np.squeeze(scores),
          category_index,
          use_normalized_coordinates=True,
          line_thickness=8)

      cv2.imshow('window',image_np)
      if cv2.waitKey(25) & 0xFF == ord('q'):
          cv2.destroyAllWindows()
          break
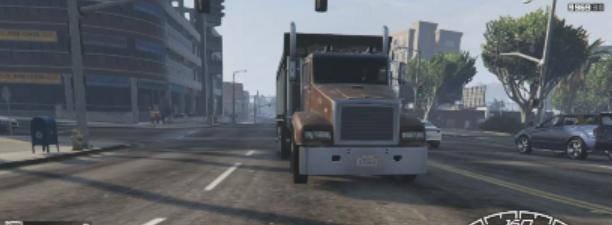
В результате, запуская GTA, мы получаем прямой поток обнаруживаемых объектов. Например, в следующем изображении:
мы можем определить вот что:
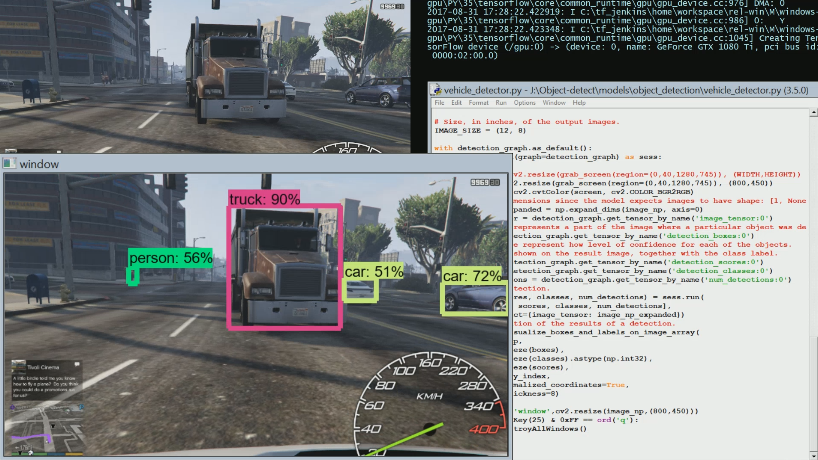
Это чертовски впечатляюще, особенно распознавание человека вдалеке.Обычно при взятом нами разрешении обнаружение на таком большом расстоянии происходит не так гладко. Таким же образом мы можем успешно обнаруживать в GTA и другие объекты: светофоры, знаки остановки, собак, пожарные гидранты, скамейки и многое другое.
В следующей статье мы переработаем этот код, чтобы определять, когда другое транспортное средство находится слишком близко от нас.
Следующая статья — Играем в GTA V c Python. Часть XV: определяем расстояние до других транспортных средств и предотвращаем аварии.