Предыдущая статья — Играем в GTA V c Python. Часть XIV: обнаружения объектов при помощи TensorFlow.
Всем привет и добро пожаловать в новую часть нашей серии статей про создание беспилотного автомобиля в GTA V. В данной статье мы будем использовать TensorFlow Object Detection API чтобы определить, не находится ли рядом с нами на дороге другой автомобиль в опасной близости. Мы будем использовать код, созданный нами ранее:
# coding: utf-8
# # Object Detection Demo
# License: Apache License 2.0 (https://github.com/tensorflow/models/blob/master/LICENSE)
# source: https://github.com/tensorflow/models
import numpy as np
import os
import six.moves.urllib as urllib
import sys
import tarfile
import tensorflow as tf
import zipfile

from collections import defaultdict
from io import StringIO
from matplotlib import pyplot as plt
from PIL import Image
from grabscreen import grab_screen
import cv2

# This is needed since the notebook is stored in the object_detection folder.
sys.path.append("..")


# ## Object detection imports
# Here are the imports from the object detection module.

from utils import label_map_util
from utils import visualization_utils as vis_util


# # Model preparation
# What model to download.
MODEL_NAME = 'ssd_mobilenet_v1_coco_11_06_2017'
MODEL_FILE = MODEL_NAME + '.tar.gz'
DOWNLOAD_BASE = 'http://download.tensorflow.org/models/object_detection/'

# Path to frozen detection graph. This is the actual model that is used for the object detection.
PATH_TO_CKPT = MODEL_NAME + '/frozen_inference_graph.pb'

# List of the strings that is used to add correct label for each box.
PATH_TO_LABELS = os.path.join('data', 'mscoco_label_map.pbtxt')

NUM_CLASSES = 90

# ## Download Model
opener = urllib.request.URLopener()
opener.retrieve(DOWNLOAD_BASE + MODEL_FILE, MODEL_FILE)
tar_file = tarfile.open(MODEL_FILE)
for file in tar_file.getmembers():
  file_name = os.path.basename(file.name)
  if 'frozen_inference_graph.pb' in file_name:
    tar_file.extract(file, os.getcwd())


# ## Load a (frozen) Tensorflow model into memory.
detection_graph = tf.Graph()
with detection_graph.as_default():
  od_graph_def = tf.GraphDef()
  with tf.gfile.GFile(PATH_TO_CKPT, 'rb') as fid:
    serialized_graph = fid.read()
    od_graph_def.ParseFromString(serialized_graph)
    tf.import_graph_def(od_graph_def, name='')


# ## Loading label map
# Label maps map indices to category names, so that when our convolution network predicts `5`, we know that this corresponds to `airplane`.  Here we use internal utility functions, but anything that returns a dictionary mapping integers to appropriate string labels would be fine
label_map = label_map_util.load_labelmap(PATH_TO_LABELS)
categories = label_map_util.convert_label_map_to_categories(label_map, max_num_classes=NUM_CLASSES, use_display_name=True)
category_index = label_map_util.create_category_index(categories)


# ## Helper code
def load_image_into_numpy_array(image):
  (im_width, im_height) = image.size
  return np.array(image.getdata()).reshape(
      (im_height, im_width, 3)).astype(np.uint8)

# Size, in inches, of the output images.
IMAGE_SIZE = (12, 8)

with detection_graph.as_default():
  with tf.Session(graph=detection_graph) as sess:
    while True:
      #screen = cv2.resize(grab_screen(region=(0,40,1280,745)), (WIDTH,HEIGHT))
      screen = cv2.resize(grab_screen(region=(0,40,1280,745)), (800,450))
      image_np = cv2.cvtColor(screen, cv2.COLOR_BGR2RGB)
      # Expand dimensions since the model expects images to have shape: [1, None, None, 3]
      image_np_expanded = np.expand_dims(image_np, axis=0)
      image_tensor = detection_graph.get_tensor_by_name('image_tensor:0')
      # Each box represents a part of the image where a particular object was detected.
      boxes = detection_graph.get_tensor_by_name('detection_boxes:0')
      # Each score represent how level of confidence for each of the objects.
      # Score is shown on the result image, together with the class label.
      scores = detection_graph.get_tensor_by_name('detection_scores:0')
      classes = detection_graph.get_tensor_by_name('detection_classes:0')
      num_detections = detection_graph.get_tensor_by_name('num_detections:0')
      # Actual detection.
      (boxes, scores, classes, num_detections) = sess.run(
          [boxes, scores, classes, num_detections],
          feed_dict={image_tensor: image_np_expanded})
      # Visualization of the results of a detection.
      vis_util.visualize_boxes_and_labels_on_image_array(
          image_np,
          np.squeeze(boxes),
          np.squeeze(classes).astype(np.int32),
          np.squeeze(scores),
          category_index,
          use_normalized_coordinates=True,
          line_thickness=8)

      cv2.imshow('window',image_np)
      if cv2.waitKey(25) & 0xFF == ord('q'):
          cv2.destroyAllWindows()
          break
Код, который фактически распознает объекты и возвращает информацию об их местонахождении и близости, имеет следующий вид:
(boxes, scores, classes, num_detections) = sess.run(
          [boxes, scores, classes, num_detections],
          feed_dict={image_tensor: image_np_expanded})
для дальнейшего анализа нам необходимо перебрать переменную boxes. Эта переменная является массивом внутри другого массива, поэтому, чтобы ее проитерировать, мы поступим следующим образом:
for i,b in enumerate(boxes[0]):
Теперь, для отслеживания положения «слишком близко» надо прояснить, о каких классах объектов идет речь. Тут можно возразить, что вообще говоря любой объект, находящийся слишком близко, нам следует избегать. Но дело в том, что для определения расстояния до объекта нам заранее надо знать его размеры.
Например, машина, которая находится слишком близко от вас и едет прямо перед вами, имея несколько футов в поперечнике, будет намного больше, чем ствол дерева, который находится на таком же расстоянии от вас. Поэтому на данный момент мы будем распознавать только автомобили, автобусы и грузовики. Вы можете отдельно, если хотите, в других циклах программы, определять более мелкие или более крупные объекты.
for i,b in enumerate(boxes[0]):
#            car                    bus                  truck
     if classes[0][i] == 3 or classes[0][i] == 6 or classes[0][i] == 8:
Далее, мы хотим быть уверены, что это на самом деле транспортные средства. Например, в функции vis_util.visualize_boxes_and_labels_on_image_array параметром по умолчанию для отрисовки распознанных блоков является оценка 0,5. Мы обнаружили это, просто просмотрев код, чтобы увидеть все варианты. Мы можем использовать ту же оценку 0,5 или выбрать другую логику, где это число больше. Важно отметить, что детектор объектов на самом деле обнаруживает довольно много других объектов, вы просто этого не видите, поскольку были определены только объекты с оценками 0,5 или больше.
for i,b in enumerate(boxes[0]):
#         car                    bus                  truck
     if classes[0][i] == 3 or classes[0][i] == 6 or classes[0][i] == 8:
          if scores[0][i] >= 0.5:
Теперь мы хотим измерить ширину обнаруженного объекта. Мы можем сделать это, задавшись вопросом, сколько пикселей в ширину имеет объект. Сделаем это следующим образом:
apx_distance = round(((1 - (boxes[0][i][3] - boxes[0][i][1]))),1)
Для большей детализации добавим:
apx_distance = round(((1 - (boxes[0][i][3] - boxes[0][i][1]))**4),1)
Если хотите, можете поиграться с этими вычислениями еще, но мы будем двигаться дальше. В целях отладки мы хотели бы выводить это число на экран. Для этого зададим следующие координаты:
mid_x = (boxes[0][i][1]+boxes[0][i][3])/2
mid_y = (boxes[0][i][0]+boxes[0][i][2])/2
Обычно это отображается слева от обнаруженного объекта и посередине по вертикали.
for i,b in enumerate(boxes[0]):
#          car                    bus                  truck
   if classes[0][i] == 3 or classes[0][i] == 6 or classes[0][i] == 8:
          if scores[0][i] >= 0.5:
            mid_x = (boxes[0][i][1]+boxes[0][i][3])/2
            mid_y = (boxes[0][i][0]+boxes[0][i][2])/2
            apx_distance = round(((1 - (boxes[0][i][3] - boxes[0][i][1]))**4),1)
Мы можем вывести это на экран следующим образом:
cv2.putText(image_np, '{}'.format(apx_distance), (int(mid_x*800),int(mid_y*450)), cv2.FONT_HERSHEY_SIMPLEX, 0.7, (255,255,255), 2)
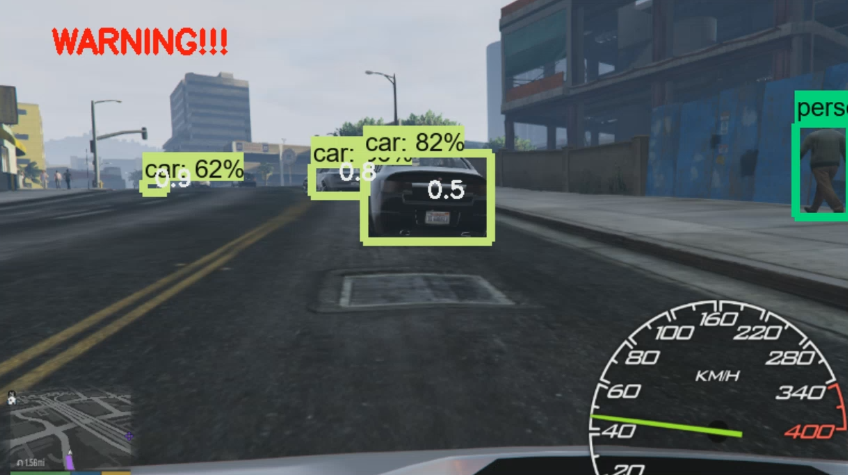
Если это расстояние меньше 0,5, то мы считаем, что это слишком близко для объекта шириной примерно с машину, и поэтому мы хотим вывести предупреждение:
if apx_distance <=0.5:
         if mid_x > 0.3 and mid_x < 0.7:
                cv2.putText(image_np, 'WARNING!!!', (50,50),  cv2.FONT_HERSHEY_SIMPLEX, 1.0, (0,0,255), 3)
Также обратите внимание на строчку: if mid_x > 0.3 and mid_x < 0.7: . Этот код пытается определять случаи, когда объект находится достаточно близко, но в стороне, и поэтому не несет угрозу столкновения. Чтобы делать это правильно, вероятно, нужно отслеживать историю и траекторию объекта. Например, если вы проезжаете перекресток мимо машины, разумный человек понимает, что, несмотря на то, что машина не находится впереди, это транспортное средство все же представляет угрозу столкновения.
Полный код на данный момент выглядит следующим образом:
# coding: utf-8
# # Object Detection Demo
# License: Apache License 2.0 (https://github.com/tensorflow/models/blob/master/LICENSE)
# source: https://github.com/tensorflow/models
import numpy as np
import os
import six.moves.urllib as urllib
import sys
import tarfile
import tensorflow as tf
import zipfile

from collections import defaultdict
from io import StringIO
from matplotlib import pyplot as plt
from PIL import Image
from grabscreen import grab_screen
import cv2

# This is needed since the notebook is stored in the object_detection folder.
sys.path.append("..")


# ## Object detection imports
# Here are the imports from the object detection module.

from utils import label_map_util
from utils import visualization_utils as vis_util


# # Model preparation
# What model to download.
MODEL_NAME = 'ssd_mobilenet_v1_coco_11_06_2017'
MODEL_FILE = MODEL_NAME + '.tar.gz'
DOWNLOAD_BASE = 'http://download.tensorflow.org/models/object_detection/'

# Path to frozen detection graph. This is the actual model that is used for the object detection.
PATH_TO_CKPT = MODEL_NAME + '/frozen_inference_graph.pb'

# List of the strings that is used to add correct label for each box.
PATH_TO_LABELS = os.path.join('data', 'mscoco_label_map.pbtxt')

NUM_CLASSES = 90

# ## Download Model
opener = urllib.request.URLopener()
opener.retrieve(DOWNLOAD_BASE + MODEL_FILE, MODEL_FILE)
tar_file = tarfile.open(MODEL_FILE)
for file in tar_file.getmembers():
  file_name = os.path.basename(file.name)
  if 'frozen_inference_graph.pb' in file_name:
    tar_file.extract(file, os.getcwd())


# ## Load a (frozen) Tensorflow model into memory.
detection_graph = tf.Graph()
with detection_graph.as_default():
  od_graph_def = tf.GraphDef()
  with tf.gfile.GFile(PATH_TO_CKPT, 'rb') as fid:
    serialized_graph = fid.read()
    od_graph_def.ParseFromString(serialized_graph)
    tf.import_graph_def(od_graph_def, name='')


# ## Loading label map
# Label maps map indices to category names, so that when our convolution network predicts `5`, we know that this corresponds to `airplane`.  Here we use internal utility functions, but anything that returns a dictionary mapping integers to appropriate string labels would be fine
label_map = label_map_util.load_labelmap(PATH_TO_LABELS)
categories = label_map_util.convert_label_map_to_categories(label_map, max_num_classes=NUM_CLASSES, use_display_name=True)
category_index = label_map_util.create_category_index(categories)


# ## Helper code
def load_image_into_numpy_array(image):
  (im_width, im_height) = image.size
  return np.array(image.getdata()).reshape(
      (im_height, im_width, 3)).astype(np.uint8)

# Size, in inches, of the output images.
IMAGE_SIZE = (12, 8)

with detection_graph.as_default():
  with tf.Session(graph=detection_graph) as sess:
    while True:
      #screen = cv2.resize(grab_screen(region=(0,40,1280,745)), (WIDTH,HEIGHT))
      screen = cv2.resize(grab_screen(region=(0,40,1280,745)), (800,450))
      image_np = cv2.cvtColor(screen, cv2.COLOR_BGR2RGB)
      # Expand dimensions since the model expects images to have shape: [1, None, None, 3]
      image_np_expanded = np.expand_dims(image_np, axis=0)
      image_tensor = detection_graph.get_tensor_by_name('image_tensor:0')
      # Each box represents a part of the image where a particular object was detected.
      boxes = detection_graph.get_tensor_by_name('detection_boxes:0')
      # Each score represent how level of confidence for each of the objects.
      # Score is shown on the result image, together with the class label.
      scores = detection_graph.get_tensor_by_name('detection_scores:0')
      classes = detection_graph.get_tensor_by_name('detection_classes:0')
      num_detections = detection_graph.get_tensor_by_name('num_detections:0')
      # Actual detection.
      (boxes, scores, classes, num_detections) = sess.run(
          [boxes, scores, classes, num_detections],
          feed_dict={image_tensor: image_np_expanded})
      # Visualization of the results of a detection.
      vis_util.visualize_boxes_and_labels_on_image_array(
          image_np,
          np.squeeze(boxes),
          np.squeeze(classes).astype(np.int32),
          np.squeeze(scores),
          category_index,
          use_normalized_coordinates=True,
          line_thickness=8)


      for i,b in enumerate(boxes[0]):
        #                 car                    bus                  truck
        if classes[0][i] == 3 or classes[0][i] == 6 or classes[0][i] == 8:
          if scores[0][i] >= 0.5:
            mid_x = (boxes[0][i][1]+boxes[0][i][3])/2
            mid_y = (boxes[0][i][0]+boxes[0][i][2])/2
            apx_distance = round(((1 - (boxes[0][i][3] - boxes[0][i][1]))**4),1)
            cv2.putText(image_np, '{}'.format(apx_distance), (int(mid_x*800),int(mid_y*450)), cv2.FONT_HERSHEY_SIMPLEX, 0.7, (255,255,255), 2)

            if apx_distance <=0.5:
              if mid_x > 0.3 and mid_x < 0.7:
                cv2.putText(image_np, 'WARNING!!!', (50,50), cv2.FONT_HERSHEY_SIMPLEX, 1.0, (0,0,255), 3)


      cv2.imshow('window',cv2.resize(image_np,(800,450)))
      if cv2.waitKey(25) & 0xFF == ord('q'):
          cv2.destroyAllWindows()
          break
С помощью этого кода мы можем отслеживать относительное расстояние до транспортных средств вокруг нас и определять, не слишком ли они к нам близки. А также данный код может сигнализировать об опасности и даже выдавать команды управления с имитацией нажатия клавиш. Однако в GTA V используется прямой ввод с клавиатуры. Это можно осуществить при помощи модуля directkeys.py. Например, вы можете видеть, находится ли объект левее или правее от вас и вашей машины. Если объект находится левее, вы можете, например, подать правее, и наоборот.
Напрмер, может быть такая ситуация:

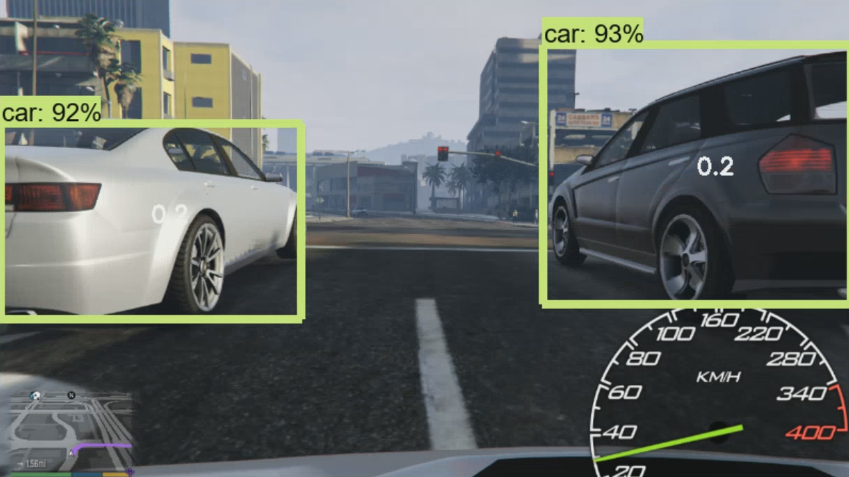
Или вот такая. Даже если мы близко, но столкновение не грозит, мы не получим предупреждения:

Что бы нам еще сделать с нашим навыком по обнаружению объектов? Как насчет… использования системы обнаружения транспортных средств для фактического завладения транспортным средством? В следующем уроке именно этим мы и займемся!
Следующая статья — Играем в GTA V c Python. Часть XVI: ищем подходящий автомобиль.

